Feb 2013

After fitting the suspension the brakes were the next job. Last time I made some brake lines i was with copper pipe but this time I decided to use cunifer pipe. This was when I found out how bad the basic Laser brake flaring tool was. Fortunately I managed to lose the forming “top hat” so had to rummage through the tool box and found the old Motaproducts tool donated by my father-in-law a few years ago. It turned out to be a cracking tool and made lovely flares.  I later discovered that the line down the transmission tunnel needs to be a bit higher at the front so that the gearbox doesn’t touch it when being fitted.

midget-brake-lines


Once the brake lines were fitted the engine and gearbox could go back in. Once installed the next task on the virtual list was to fabricate a bracket for the alternator. It was made from 5mm plate and shared the 2 front mounting holes with the engine mount. Alignment was done with the Mk 1 Eyeball but after assembly it looks like that this needs recalibrating. That plus a bit of play in the alternator mounting hole resulted in 4.5mm misalignment. The alternator mounting hole was drilled out to 12mm and lined with some 12mm OD alloy 1mm thick tube that was a nice fit to the 10mm bolt.  A bit of a tweak on the bracket mounting  holes resulted in a near perfect alignment.  The tension arm came from the pot of odds that one accumulates and will be shortened at some point.

alternator-fitted

The steering rack and column were fitted to check space etc. Next up is the cooling and fuel injection.

Winter months

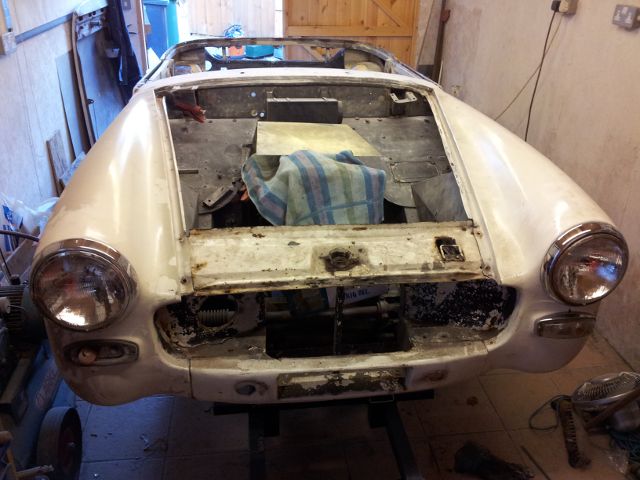
The cold weather put a stop to finishing the spraying so early December I had to find something else to work on. The back axle & spring assembly had been stored under cover beside the shed so this was moved into the dry for some attention.

I will be so glad when all the cleaning of greasy and rusty parts is over and the axle was a mess. Here’s the axle before I started.

axle

The spring mounting pads were seized.

rusty-spring-mount

The axle was completely stripped down. The front metalastic bushes were drilled out and everything was cleaned with a wire wheel and rust treated then coated with some chassis black.

The diff was rough to turn so was stripped and needed a new pinion oil seal and the pinion front bearing was worn. At this point the list of parts required was growing.

Attention turned to the front suspension and more stripping, removing of grease and rust was undertaken.  The kingpins were removed and it then became apparent that the lower bearing surface was corroded and the kingpins were a loose fit into the stub axle.

rusty-kingpins

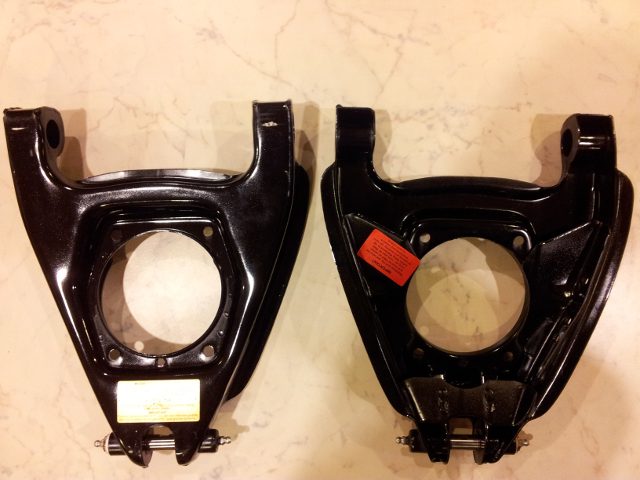
Attempting to remove the kingpins from the wishbones revealed the next issue. The fulcrum pins were seized to the kingpins and the trunion had a lot of play in the threads. Cue more expense, this time for a set of wishbones. However rather than pay £60 each for standard pattern parts I took what I hope is the better route and purchased a pair of Barry KIng premium wishbones – see http://www.spridgetwishbone.co.uk for more details.

2013-wishbones

Among the pile of spares I’d been acquiring was a pair of new king pins and fitting. The new king pins were tried in the uprights had the lower bushes were shot. The old ones were drifted out and new ones drifted in and then reamed using a reamer I’d purchased over a year ago. It would have been as cheap to buy refurbished ones but I wanted the challenge and I’m rather enjoying all this.

As you work though these tasks you find that more parts are worn or broken so more parts have been ordered. Even things like 3/8″ UNF bolts had to be ordered because I didn’t realise I’d need so many. I was thinking of replacing UNF bolts with metric ones but the number of captive nuts and studs would have cause confusion so I’m sticking with the UNF bolts where originally fitted and will use the metric ones on the engine.

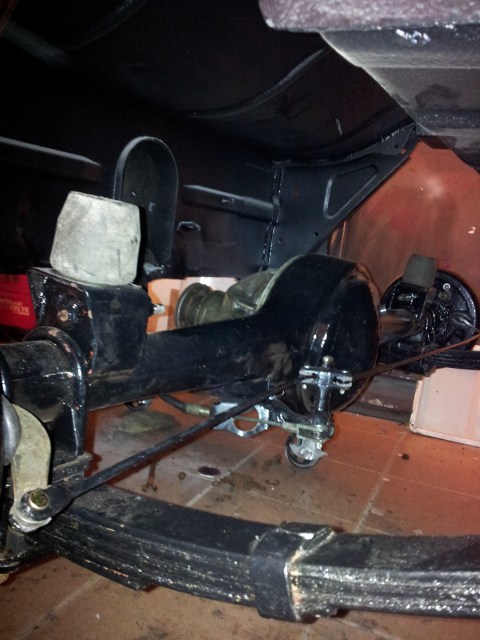
As of January 24th the axle, diff and spring assembly has been bolted to the chassis. The handbrake linkages were worn so the holes were welded up and then re-drilled and all painted etc to look good.

2013-axle

With the axle fitted attention was turned back to the front and it was assembled and included poly bushes as well. The original dampers have been retained for now but will probably be modified once the car is on the road. I want to experience the improvements with each change rather than just throw them all on now plus if I did that I’d never finish it.

2013-suspension

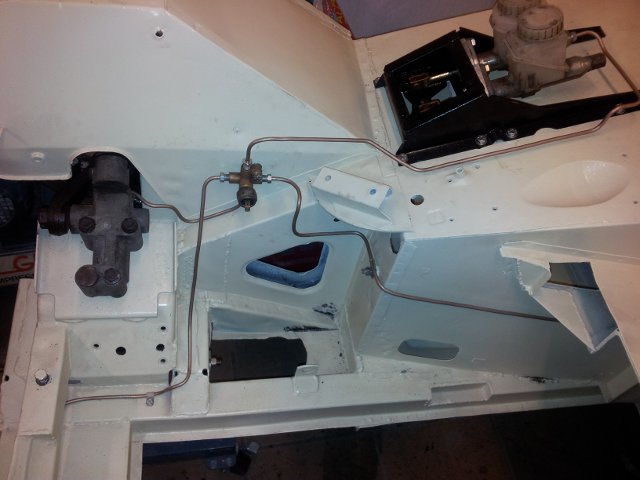
This is the nearside fitted and just the offside to go. I’ve also been working on the pedal box and made up some 1/4″ spacers to space the clutch and brake cylinders away from the housing. The effect of this is to move the pedals just over an inch towards the bulkhead. Apparently there is still enough pedal travel if you do this…..time will tell if this is the case but being close on 6’2″ I need as much space as possible.
Edit: April 2013.  Spacing the master cylinders to move the pedals resulted in insufficient pedal travel so the spacers were removed.

2013-suspension-fitted

Here’s the suspension bolted in and the pedal box was about to be assembled and fitted.
Next step will be to plumb in the brake lines then drop in the engine.

Primed

Progress seems very slow so I needed something to give me a boost.  The rear end has had a lot of attention and a kilo of filler of which most appeared to be sanded off again. The photo below is from part way through the filling stage and I’ve come on a bit since then. It just needs final sanding and defect filling then will be ready for a primer.

rear-filling-in-progress

The scuttle and A pillars were next for attention and to ensure that all was aligning correctly the wings and nose were trial fitted. Suddenly it looked like a car again.

front-trial-fit

The nose section required a bit of welding and took a few evenings to clean to bare metal and was the most awkward item to work on so far. I just couldn’t get it to stay still or in a position that I could comfortably work on it, hence 2 evenings work.

To give me that boost and to clear some workshop space I decided to spray the front end. This will then allow me to drop the engine back in and move the hoist out of the shop into another shed. Here’s how it looks tonight.

front-in-primer

A 4AGE in the hole

Used up another days leave and made a bit more progress in the engine bay.  The usual practice is to fix the engine mounts to the chassis rails on the Konversions after strengthening them. The original engine is mounted on to the suspension turrets with brackets taken from the front of the engine and after a while just sitting and looking at the engine bay that is the route I decided to take.

Hunting through the pile of metals produced some 5mm plate and in another drawer was a Fiesta Mk1 engine mount left over from a Westfield. The Fiesta mounts were ideal for this conversion because it was easy to fit them on the surface from where the original mounts were removed.  I know it doesn’t seem like much completed for a day spent in the garage but I’m chuffed.

engine-mount2

engine-mount1

It’ll fit

After doing other jobs like oil changes on the 964 and repairing another compressor it was time to look at the Midget and see if the engine will fit.

The picture below says it all.

engine-trial-fit-1

Now for plan B.

I have paint…

Been a mixed few days since the last posting.  Friday morning another courier turned up and delivered the remaining paints and fillers. Thank you UK Mail, you delivered next day and at the first attempt.  After sending my dear wife to work it was into the garage for a clean up and masking session. Mid morning I started on the barrier coat and just as I’d finished spraying the compressor died. It is only a small 25l Tiger and it had to work hard to keep up so it really needs replacing with something bigger.

Saturday was spent at MG Live in Silverstone and this was our first MG show. Having stayed locally overnight we arrived just before 09:00 and a lot of stall holders were still setting up. Learnt a few things from chatting to the drivers in the paddock and then checked out the Magic Midget stall and had more useful advice.  I managed to pick up a set of anti-tramp bars for half price so didn’t come away empty handed.

Sunday started with a trip to Maplin to purchase a capacitor for the compressor. This is the state of the old one:

capacitor

The good news is that this fixed the compressor so on with the next task, painting the underside of the car.  All went well and it will have another coat tomorrow but it looks far better than it did when the car arrived and it will do for me.

painted-chassis

Slow progress… continued.

Another weeks holiday to use up so set the target of getting the car back onto axle stands. By the start of this week the underside of the floor pans and the rear wheel arches were epoxy coated, seam sealed and the wheel arches were stone chipped.  All I had to do was prime and spray them with a chassis black then I could drop them body onto axle stands and return one engine stand to its owner.
However the folks at City Link obviously decided I had better things to do so didn’t deliver the paint on Tuesday and claimed I wasn’t in. Wednesday PM I’m wondering where the paint was and chased the supplier. He supplied a tracking number and that was when I discovered that they’d done the “phantom card” that City Link are renowned for. I commented to the supplier that they would probably at 18:15 update the system to say no one as in, but I was wrong. They updated the system at 17:47 to say I wasn’t in and had left a card. Complete utter bollox.
I advised the supplier that they’d not delivered and using City Link’s system I said I’d collect from their depot. The supplier then rang before I set of this morning (Thursday) to say that despite saying I’d pick up the parcel, it had been loaded onto a van at 07:18.  Here I am at 17:25 waiting for the paint to arrive but suspect that it will be in the depot very soon and I’ll have a trip over to collect it.

Having nothing better to do I’ve moved stuff out of the garage into the wood store and then thought I’d strip the paint off the body work. A thoroughly dirty and noisy job but very satisfying to see a change and some progress, and what’s more I’ve even taken a photo.

2012-06-21 11.57.45a

Edit: 18:55 and the paint arrived.

Slow progress

It has been a while (nearly 5 months!!) since I posted an update on the Midget.  Unlike my mate Crispin who is making progress on his 106 Rallye, the Midget seems to be dragging on and on. With a weeks annual leave to use up I cracked on with the target being to get the underside epoxy coated and stone chipped and get the chassis back on to axle stands. However come day three I realised that this wasn’t achievable due to other dependencies.

The first non chassis task was to modify the gearbox tail to position the gear lever further forward.  The tail was removed and carefully measured and the cut lines marked.

type-9-pre-cut

Cutting commenced and almost immediately there were sparks from the rear cut – I’d just managed to clip the sleeved bearing. No problem really and once removed  was cleaned up, the oil seal removed and then welded by a local chap.

While it was away attention turned back to the chassis and more cleaning up in preparation for coating the underside was done.

Today, while doing some more tweakng for the gearbox I managed to slice a finger on the cutting disc in the angle grinder. Carelessness stopped play.

Roll over

A few weeks ago I finally finished the nearside floors and part of the wheel arch. Today was another step forward when the body was mounted onto a spit made from a couple of engine stands.  Unfortunately the stands are about an inch too low and the body won’t spin 360 degrees but a least I can get to the underside now.

2011-12-04125722a

Offside wheel arch

Progress has been slow and I didn’t realise how long ago it was that I last updated the site.  The offside wheel arch is the current focus of attention at the moment. The idea is to get the chassis structurally sound so that it can go onto a rotisserie and then finish off the body work.  As the rear spring mounts are attached to the chassis member that attaches to the side of the wheel arch and the floor, it was essential that the wheel arch and floor were solid.  A small repair to the chassis member was made one evening (so that I had a reference point to ensure the rear didn’t sag) and then a section of the floor with the shock absorber bracket was cut away.

The inner wheel arch had seen many repairs and these repairs were failing.  Rather than buy a new inner wheel arch at around £170 I cut out the minimum I could and using cardboard templates I cut a sheet of 0.9mm steel to an approximate shape.  Plenty of hitting it with a hammer had it formed to shape and again the Cleco pins were a huge help in allowing the work piece to return to the same spot for making and forming. The new panel was then butt welded into place and finally a repair section for the floor to wheel arch was fabricated and welding into place.

Someone forgot to charge their camera battery so no photos at the moment.