I’m sill here

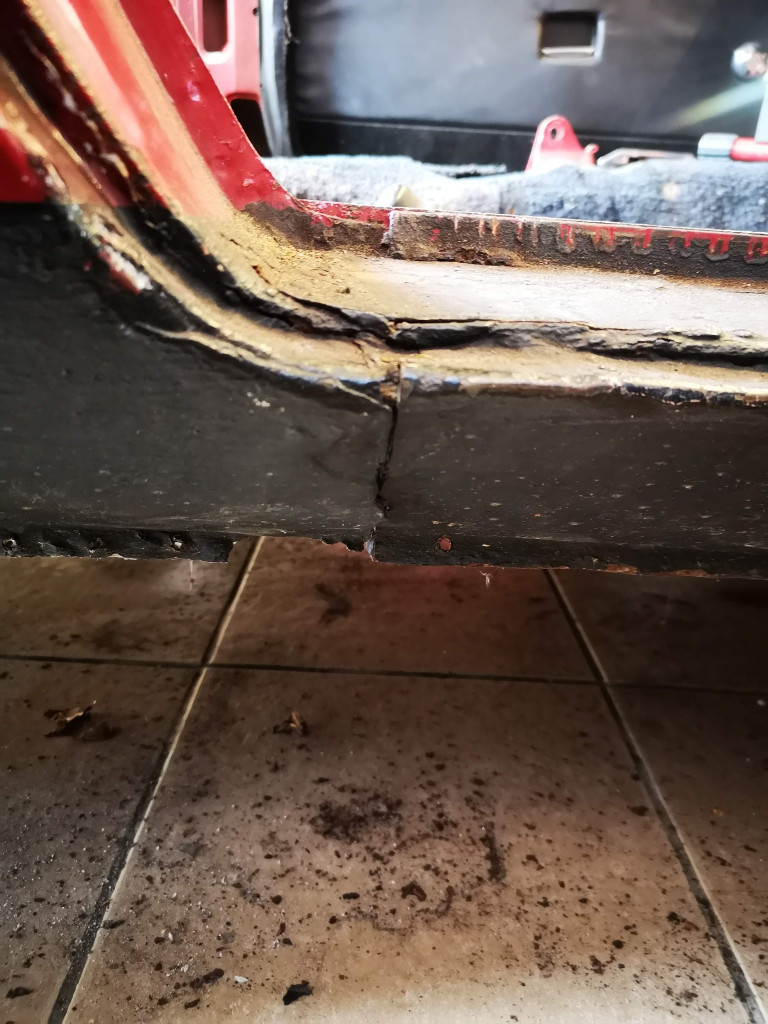
The last month or so has seen me tackle the usual GT6 rust areas, namely the A lower posts, sills and floors. This body while not good it wasn’t as bad as my Midget at the floor level. The floor pans were only rotten on the outer edges and the front and rear corners. The inner sill was also only rotten at the lower 30mm or thereabouts. Therefore I decided to take the patching route rather than replace them and this has the advantage of maintaining the door gaps.

The outer sills were removed seeing as they were not doing much and were only pop riveted on. This allowed better visibility for repairing the lower part of the inner sills.

OS sill was pop riveted into place then covered in filler and underseal.
Somewhere there is metal…
Quality patch repair – I doubt that passed a MOT.
And more quality repairs.

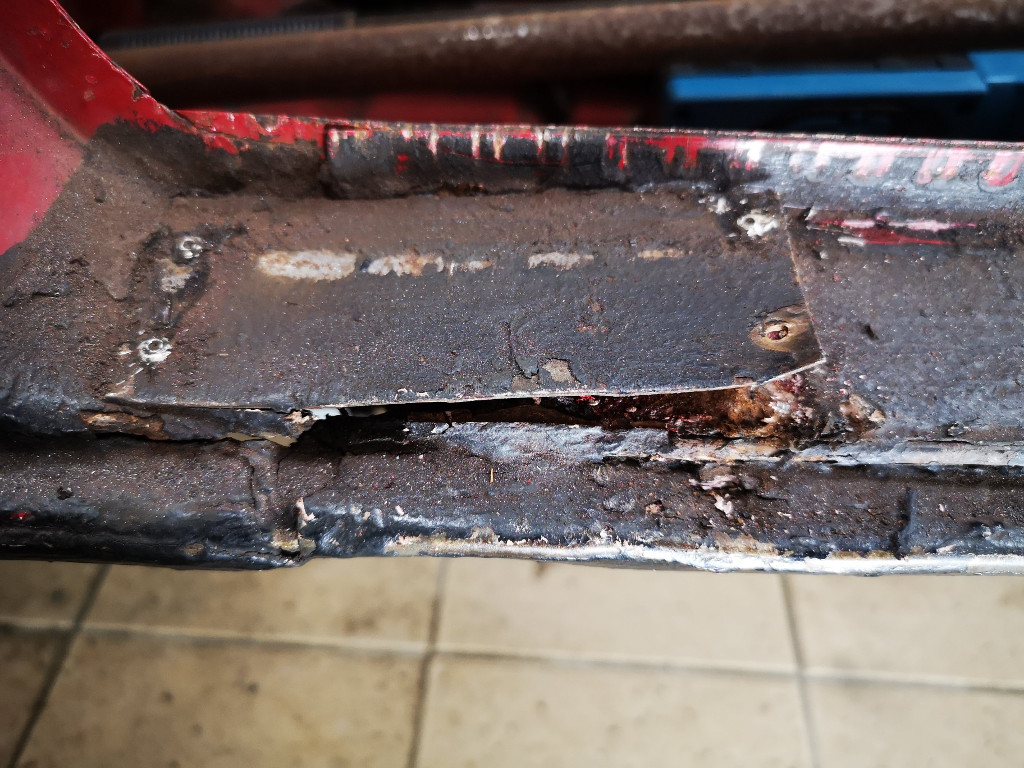
On the nearside I repaired the floor first because there was enough of the inner sill to use as a level reference for the floor pieces. On the offside I did the inner sill first because there wasn’t much of the return lip that the floor mates against.

Nearside floor edge and rear repair including new metal on the heel board.
Nearside sill in situ with a few plug welds.
Offside sill fitted.
Checking the door alignment.

Work continues on the offside B post and one small repair is needed to the floor pan then it will be time to turn the attention to the wheel arches.

Screen Surround

After stripping all the interior from the GT6 and carefully cutting out the windscreen it was time to sort out the screen pillars. There was very little strength in the pillars and at some point in the past they gave way (when the front of the roof was cut out?) and the bulkhead sagged under the weight of the doors. First job was to push the bulkhead into position with a 10 tonne ram. There was no evidence that the door hinges had been adjusted so the doors were used as a reference for repositioning the bulkhead . When they could be opened easily and the bottom of the door roughly aligned with the sill it was deemed to be in the right location and some angle iron was welded across the door gap. The passenger side was braced with an adjustable door bar.

Hydraulic ram used to position the bulkhead

The car came with the side pillars and top of a Spitfire screen surround and this was grafted into place one side at a time. The old screen & seal was used to ensure that the opening was the correct size and shape. The internal section of the original top screen surround was retained and the new surround welded to that. Without a roof section there were no reference points so this was the best option.

Offside half of the Spitfire screen pillar tacked into place.
Nearside pillar about to be tacking into place. More fabrication required to fill the voids.

Once the pillars were tacked into place the roof section was repaired using several strips of steel bent, stretched and shrunk to roughly match the desired contour. There was a supplied roof repair section but that just didn’t look like it would fit plus I didn’t fancy the flange along the top of the screen.

Next up was to put some more metal into the upper section of the A pillar. This meant removing the doors so the door alignment was double checked at this point to ensure that the ram & door bar were still holding the bulkhead in the right place.

Just the start, more fabrication required once the door was removed.

Project Lock-down

With the threat of a lock-down looming there was only one thing to do – get another project. I’d been looking for a MGB GT for a few months but nothing nearby really ticked the box, especially for a skinflint like me.

Then I spotted a GT6 re-appear on FB and it was down the road. What’s more, the vendor knew someone who could deliver the car. A more accurate description would be “bits” because when I viewed it the “car” was laid out across a workshop floor.

Within the week the rolling chassis full of bits was delivered and the fun began. For now here are a few photos from delivery day and during the strip down of what was left inside the car.

As delivered..
..and boxes of bits. Probably 85% complete.

Various quality repairs over time.

Interior update.

There have been no updates because basically I’ve done very little to the Midget that is note worthy. So in one post I’ll cover the whole of 2018 starting with the interior.

Many years ago I found an abandoned black leather sofa near my home so I decided to salvage it for materials.  After years of sitting in a bag I finally had a use for some of the leather.   I give you a set of quilted transmission covers.

Transmission tunnel covers made from a recycled leather sofa.

Attention has now turned to the seats and this is very much a work in progress item. The Caterham seats I fitted a couple of years ago are showing their age and are sagging. They now offer little support and look awful so I’ve started to revitalise one. The tube foam on the frame as been replaced and additional foam sheet added. The first unfinished attempt is below.

Work in progress cover for a Caterham seat.


More tweaks

I’ve been rather slack regards updates so here’s the last 8 months in one post.

The front dampers have been replaced with MGB units fitted to some Mamba Motorsport adapters.  The only real issue was that one damper ended up with some air in it and offered zero damping. Once this was cleared they worked fine.  The only slight reservation is that there isn’t as much droop before the shock bottoms out.     

adapter-platemgb-shock-fitted

One problem with the Midget is that it isn’t designed for people near on 6’2″ in height. This means that seat selection is crucial in order to fit comfortably. Therefore when I had the chance of a pair of Caterham seats I grabbed them.  They fitted nicely and it really feels like I’m sitting on the floor – they’re that low. They also are quite comfortable and even Mrs S likes them.

caterham-seats

The final obvious tweak has been the new grille that was picked up for £20. It looks much smarter than the original black grille but part of me still quite likes the original grille.

new-grille

Still here

Things have been quiet on the Midget front due primarily to the other project at the coast but there have been a couple of tweaks lately.

The cams have been swapped over so the 264 is now on the inlet and the 256 is on the exhaust. The butt dyno felt that it was better that way but the interweb suggested otherwise. Also recently acquired were a pair of HKS vernier cam pulleys which looked great until I came to fit them. I can only assume that they were not for the 16V engine because the locating pin hole was larger and they didn’t align with the pulley alignment mark on the backing plate.

Ten minutes on the pillar drill and the pulleys had new location holes drilled in the correct location. Not sure I like purple but they’ll be out of sight for most of the time.

cam-verniers

The other minor tweak has been the fitting of a shift light on the dash. As I’m running a Megasquirt ECU it needed an output transistor stage added and fortunately I had the foresight to add the wiring in the loom for the 3 additional output wires when creating the loom. Once wired up I was able to set it to trigger at 3000rpm to prove operation and now it is set it to activate at 7000rpm. That should allow me enough time to shift up before the 7300rpm rev limit.

Day 1 at the beach

We finally have our home by the sea and this place has the wow factor – not to be confused with the WOW! factor. The decor is somewhat tired and stuck in a time warp but the location and tranquillity won the day.

Enjoy the pictures and remember that the camera can be flattering at times.

day1-lounge

day1-loungelight

day1-kitchen1

day1-kitchen2

Lets just say in needs a clean.

Stairway to Heaven
Stairway to Heaven

Master bedroom
Master bedroom

The view north - looks quite pretty really.
The view north – looks quite pretty really.

The back bedroom.
The back bedroom.

To the loft room.
To the loft room.

The loft room.
The loft room.

Nice pictures
Nice pictures

All too much for some.

Half Shafts

Having been on the road for a year it meant I was due for another MOT.  Nothing much to report other than failing on headlight aim on the O/S light. This was due to the front springs being uprated to 340lbs and I did lower the aim back then but obviously not enough. Anyway, that is sorted for the next year.

This deas mean I’ve been running for a year with the standard EN17 half shafts and the interweb suggests that they twist and break just by looking at them. On the other hand there are people with them in their K Midgets and they’ve never had an issue. I decided to take no chances and a pair of EN40B shafts recently arrived from Magic Midget.

magic-midget-drive-shafts

After a couple of days admiring them in the living room I was told by SWMBO to remove them from the house so yesterday they were fitted and it only took 35 mins, which was nice.

half-shaft-fitted

This now means I need to add more power….

Assistance needed

With the GreenStuff pads fitted the braking has been what I’d expect from a non assisted setup and is similar to that of the Westfields I’d owned previously. A good firm push will really slow the car down and it is possible to lock the brakes. However jumping from a fully assisted Volvo or Porsche into the Midget does highlight the difference in pedal effort. Therefore it was time  to fit a brake servo primarily to boost the initial braking action.  Having sought  advice from the K Midget Facebook group I ordered a Powertune 1.6:1 unit from MGBHive and waited for it to arrive.

In the meantime I had a set of 256 & 264 HKS cams arrive for the 4A-GE and today the camshaft oil seals arrived so out into the man cave I went. The camshafts were fitted in about an hour (the 256 went on the inlet and the 264 on the exhaust)  and then the courier arrived with the servo which was hastily un-boxed….

servo-1

Fook it is big!! I was hoping it would fit in the gap between the brake master cylinder and the wheel arch but being 7.5″ diameter there was no way it was going in. It was now looking like either an expensive paper weight or else it was a long job ahead

A cuppa and an early lunch later and it was time to man up and pull the offside wing off the Midget. Fortunately one of the K Midget boys had posted a pic of the servo mounted under the wing so I knew it was doable.

servo-fitted

Here’s the servo fitted and plumbed in before refitting the wing and below is the finished job with next to nothing visible although the camera didn’t pick up the wing edge.

servo-hidden

Due to the rain a brief test was carried out on the gravel drive and I can confirm that the brakes do work although they probably need another bleeding.


Rolling Road

The local Pistonheads crowd had organised a rolling road session at Clive Atthowe’s place in Norwich so it was an ideal opportunity to see how the Midget performed with the Megasquirt fitted.

The result was a rather surprising 124bhp at 6700rpm and the power was still climbing. The AFR was rather lean running between 15 and 16 so it wasn’t taken to the 7200 limit.

midget-rr

I’m still rather chuffed that it produced more than the stock 122bhp and yet there is still more to come.