Hoody

The main achievement this week has been fitting the new hood. The vinyl of the original hood was still in good condition but the windows were torn so a new hood was ordered from donhood.com.  It was with trepidation that I started fitting it but marking the centre line on the car at the rear and on the hood gave me confidence that it would at least be central.  I used the fitting instructions downloaded from the MGOC because they were more concise .

The header rail was pop riveted in place as per the original mainly because the holes were a bit too large for screws. Hopefully I’ll have no need to remove the hood from the rail.

hood-rear

hood-front


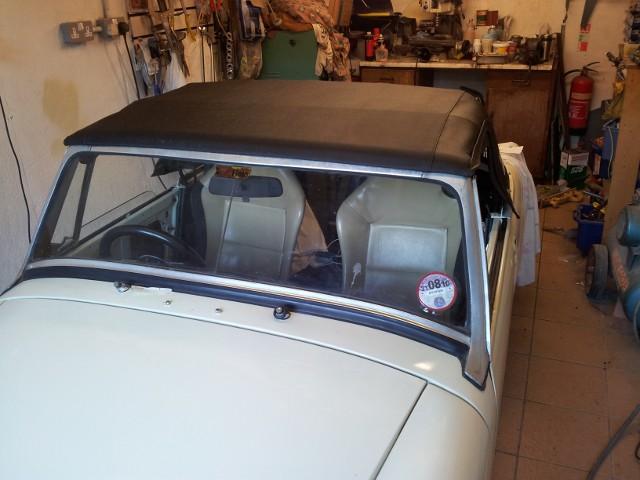
The hood came with 6 Tenax fasteners but I’ll use 2 more to replace the velcro strips used on some Midgets and these are still to be fitted.

Since the above photo was taken the passenger door handle and lock are installed and the inner window strip was also fitted.

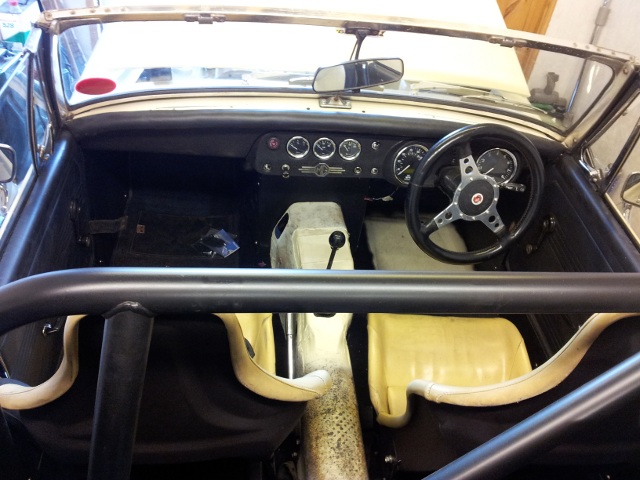
It is now the 22nd and I’ve just realised that I didn’t publish this post so here is a bit more… The to-do list is getting shorter following a few evenings working on the doors. The door mirrors were fitted using the Midget specific mounts for the Tex mirrors.  I did remember to wind the window up before drilling through the door…

behind-you

To save time the existing navy blue door cards were re-used and I’ll sort something out when I’m on the road. It could be new door cards in black or I could try spraying the navy ones, we’ll see. I’m sure the MOT man won’t care too much that the cards don’t match the rest of the interior.

door-cards

Next up will be finishing the tunnel area. I’m hoping to be MOT ready in two weeks.

Mind the gap

Slowly getting there (I say that to keep me going) but all the finishing bits take more time than expected. Finally finished making the interior panels for the main tub of the car and just the door cards to make at some point. All the carpet is now cut to shape and glued in place and the contact adhesive makes the Midget now smell like a TVR.

Fitted the doors and for some reason the passenger door didn’t seem to fit properly in the gap any more.  A few minutes with my favourite hammer and the gap was opened up but now I need to repaint that section of the car.

door-gap

At the weekend the paintwork was redone using a cheap £10 touch up spray gun and the quality of finish was far better than the rest of the panel so I may have to revisit this at a later date.

And finally tonight I’ve fitted the seatbelts and the newer Elise  seats that I picked up locally at the weekend. Fitting the seatbelts involved removing the roll over bar due to the latter blocking access to the seatbelt mounts on the wheel arch . It really is starting to look like a complete car.

elise-seats-midget-1

The week – part 2

Day 3 of the week’s push for completion and it feels like little progress today.  Little progress however means that the indicator bulb holders have been repaired, cleaned up and fitted. All the wiring to the front of the car is now complete and secured out of the way.  I can’t recall how the bonnet release cable was secured because the original securing bolt was broken off so I made up another cable end. While messing with the bonnet release I ended up shortening the outer casing because I’ve relocated the bonnet release due to the custom heater box being in the way.

The other tasks done included fully fitting the nose assembly and making up a cowl to fill the gap between the nose and the radiator.  The front bumper was retrieved from storage and bashed into a straighter shape with a large hammer.  It isn’t in good condition but I’m not building a concourse car and it does serve the purpose of hiding the poor front end.

rad-cowl


front-bumper-fitted

The rear number plate is now fitted using LED plate bolts but while at the back of the car I noticed a fluid leak. The brake line into a wheel cylinder was leaking quite badly. Quite why this hasn’t leaked before I don’t understand but tightening the connector and testing didn’t show any more leaks so fingers crossed and I’ll be keeping an eye on it.

Days 4,5 & 6 were also spent decorating so not as much Midget fettling time.  The front bumper was fully fitted but not without doing things the hard way. It didn’t come fitted so I acquired some mounting brackets and it needed 2 x 1/2″ UNF nuts. As usual I didn’t have any but I found a 1/2″ UNF tap so some 7/16″ nuts were opened up on the lathe then tapped and hey presto I had a pair of nuts.

Next up was the USB charger point that we now seem to rely on. A £3 dual cigarette & dual USB unit was wired into a permanently live supply with a separate under dash fuse. It then dawned on me that as it steps 12v down to 5v that it would draw a current all the time so the fuse is pulled for the moment and a switch will be fitted somewhere. Fortunately there is a LED indicating when it has power so I shouldn’t leave it draining the battery…

usb-charger

Attention then turned to the interior and finishing making the panels and carpeting the lower sections. More on this later.

The 4A-GE Midget gets closer

Having to use up a load of holiday I’ve another week off so can spend some time on the 4AGE Midget.

With a spare hour on Saturday I managed to attend to the wings. Being GRP wings I didn’t take them to the gel coat and sure enough a couple of areas reacted to the primer on one wing. A rub down and a spray with a barrier coat paint had them ready for priming.  Monday was a bit cold but I was able to prime and top coat the wings an bonnet and rectify the boot lid.

Fitting the bonnet was easier than I expected but the rear edge was rather low. I was expecting to have to shim out the hinge but after a lot of searching I found a reference to placing blocks of wood under the V of the hinge and then gently forcing the bonnet down. Sure enough that raised the rear of the bonnet to the top of the scuttle.

You can just make out that the rear of the bonnet is below the top of the bulkhead.

Having had to move the car earlier to make space in the shed, it was frustrating that it wasn’t running as well as it had before. If revved it would die at 3000rpm and just wouldn’t run. I’m rather ashamed to say that the problem was a lack of fuel and as soon as I put a gallon in the tank the fuel gauge moved from empty and it started to behave.

Day 2 of the holiday and I’m winging it today.  The wings are GRP and I recall that they weren’t a brilliant fit when I got the car. Therefore I’m not expecting miracles and will have to accept that I can only do so much with them.  Come lunchtime and I have the offside wing fitted and come mid afternoon both wings are bolted into place and aligned the best that I can. The offside wing is slightly shorter than the bonnet and this is something I spotted on a couple of cars at Silverstone a few years ago.

wings-fitted

After a coffee break it was on to the wiring ( a job I really do like ) and time to fit some new headlights. With the headlights fitted it was time to test that they worked. Battery connected, ignition on and we have dipped beam but no full beam. The full beam relay didn’t even click so that was swapped with the known working dipped beam one but still no joy.  For some reason I went straight to removing the fuse & relay box and the cause was obvious, some muppet hadn’t fitted the relay signal earth lead. Ten minutes and one lead later and we have working main beams.

bright-eyes

Just as I was turning the car round on the gravel drive my dear wife  arrived home to witness some hooligan behaviour 🙂

Time for an Old Crafty Hen to celebrate…

Seating

The other week I managed to get the wings and bonnet in primer but found some residual paint that reacted with the primer. They’ll need rubbing down in a few spots and a barrier coat applied before they’re due for the topcoat next week.

In the meantime attention has turned to the seating and this is where the fun starts. Being 6’2″ I need to sit as low as possible to keep my head below the top of the screen and below the roll bar. Space for long arms is another requirement so a seat that is tilted as far back as possible will help however the presence of the roll bar is preventing this with the majority of seats.

As I have a pair of Elise bare shells they’ll be initially fitted until I find the perfect seat. The seat runners are from an old pair of TVR seats that were in the shed and fitted with just a new rear mounting hole drilled through the runner base.  The frame to take the Elise seats was fabricated from some 3mm x 75mm steel and bolted to the top of the runners.

This is the drivers seat showing how it has been angled to clear the side of the car and it points towards the pedals rather than being offset to the left.  Having a Porsche 964 where the pedals are offset to the left I’m used to offset pedals but here I’m lined up nicely with them but have an offset sheeting wheel.  It is called character.

Elise seat offset to the left
drivers-seat-a
View showing drivers seat in relation to the roll bar.


Rolling on

I’m starting to feel like I’m on a roll and that the 4AGE Midget is making real progress although as usual I’m having to revisit some jobs. The GRP wings have had some attention dealing with cracks and drill holes. The trial fitting however highlighted another problem, how do I top up the brake fluid?

brake-reservoir-cap

The Tilton master cylinder lid wasn’t removable due to the wing being in the way. Fortunately the Tilton was part of a kit and a few hours later the reservoir was remotely mounted.

The other day I picked up a nice set of Minilight style wheels and for the first time in about 3 years the car is off the axle stands.  I was rather shocked at how low it is and foresee a bad back from bending over it if I’m not too careful.

Here’s the first escape from the shed…

on-wheels


The hydraulic clutch wasn’t working and sounded like it was leaking fluid but fortunately I had the old brake master cylinder spare so this was substituted.  I still wasn’t getting the clutch to release so the spacer that was there to move the pedals nearer the bulkhead (this was a suggestion I’d seen somewhere) was removed.  This was a success and now the clutch worked.

Evidence that it could move under its own power….

evidence

The 4AGE Midget update

It has been just over 2 months since the last update and things are moving forwards. After I’d posted the manifold pictures I made a list of jobs to do before I could fire up the car.  Looking back now I realise that I’ve done quite a bit so here’s what has happened.

The engine bay wiring was completed and the fuse and relay boxes wired up. Temporary wiring for the fuel pump and ignition switch was installed. The wiring for the alternator and starter was revisited to move it out of the way and protect it from the heat of the manifold.

MidgetFusebox


The fuel lines were all fully secured and all clamps tightened and a sleeve knocked up for the fuel rail for blanking off one of the extra banjo connectors. After a bit of messing around caused by me wiring the ECU to the wrong side of the fuel pump relay, I had a working fuel pump.  The engine and gearbox oils were added and with a temporary 2″ straight pipe to the rear it was time to try firing up the engine.  A bit of tweaking to the fuel map and ignition was required but after about 15 minutes of tweaking it fired up for 10 seconds. October 23rd 2013 was a major milestone in this project. With no coolant in the system it was left at that short run but at least it worked.

The exhaust system was fabricated from straight 2″ pipe plus an over axle bend. This needed lengthening on each of the up and down sections to match the bodywork and the mounts were made using 3 classic Mini mounts.  A couple of mild steel silencer boxes and a few more bends and the system was completed. To give it the new car look it was sprayed with silver BBQ paint. Time will tell if this lasts.

exhaust-overaxle

Last week I started the wiring to the rear of the car and today that was all pretty much finished bar a few cable clips that need fitting. All the rear lights work but I might replace the bumper mounted number plate lights with LED number plate bolts instead. The only reason being that it will be easier to seal the bolts that it will the cable to the bumper mounted lights.  Cloth tape was used because it looks more authentic and seems to hold together over time better than PVC tape.

The prop shaft arrived from Bailey & Morris today (very impressed with their service) and was eventually fitted. Trying to get the prop into position while working on the car on axle stands and with the axle and fuel tank fitted a challenge.

Midget 4AGE Manifold

So last time I signed off saying that I’d be doing more cabling to get the thing running.  Instead I replaced the steering rack gaiters because the ones I’d picked up from a parts supplier on ebay didn’t actually clear the rack fully. That’s another tenner wasted but at least the ones from MEV Spares (jumblemaster) are the correct size.  If I had more spare time I’d visit MG Mecca a bit more for spared as they’re only 20 miles away but unfortunately I have to work.

The heater took some time to sort out. The original heater is the early style square box but the snail fan was on the wrong side for me due to the throttle bodies being in the way. The solution was to turn it round and then weld up the holes in one panel and drill new ones in for the matrix in the other. Rather than use the snail fan assembly I knocked up a slim housing that I welded onto the heater box. The fan blade needed sliding onto the shaft a bit more and the fan motor mounted on some spacers to locate the fan in the narrow housing. I then was able to fit an input pipe from a 1500cc car and the end result looks good.

modified-heater

The last week’s work has been spent knocking up an exhaust manifold from a few steel bends and a laser cut manifold flange.  Total cost is just under £80 for the manifold which while it isn’t perfect it will do. It is made from mild steel but I had a 20 year old TVR that still had it’s original manifold so I’m hopeful this will last at least as long.

exhaust-manifold1

Other highlights of the last month or so include fitting the windscreen (can’t believe that I don’t have a photo) so that I stop placing tools on top on the body.

Summer 2013 update

Three months on from the last update and there is progress.  A few quids worth of silicon hoses arrived from various suppliers mid July that should be sufficient for creating a bolt together solution.

hoses


One thing missing was some hose joiners and this is where my DIY mentality came in. You can get 32mm alloy diameter aerial masts quite cheaply and these make great hose joiners but they need a bead. Bead formers run to several hundred pounds so seeing as I have a lathe I knocked one up using bits of steel lying in the shed.  The end result is a bead former that is adequate for occasional use. The roller is turned using a  socket wrench and a spanner is used to apply the pressure in stages.  It takes between 4 and 6 revolutions to get a nice bead and works fine for the limited use I’ll put it to.

bead-former

And here is the first bead I made – before painting the bead former for the sharp eyed ones out there.

first-bead

The hoses could now be cut and joined up to proved a cooling system and were loosely fitted into place.

Next up was the fuel system and the fuel tank was bolted into place. This did require the boot floor to be “raised” with the aid of a hammer above the sender to clear the connector but it went in ok. The 8mm and 6mm hard fuel lines took several evenings of work to shape and fix in place and then another evening later the fuel pump and fuel filter was bolted to the rear bulkhead.

Turning attention to the front end it was time to start final assembly of the engine area. A quick stop at Screwfix for some hose clips and I picked up 10 in each size I was likely to use. These weren’t their cheap range so I expected them to be good but they snapped before they were reasonably tight. The Terry clips I’d used before worked fine so a quick online order and I had 60 Terry clips and they worked out the same cost per clip as the Screwfix ones.  I really must stop buying own branded junk and stick with the known brand names.

So today the hoses were fitted followed by the final fitting of the inlet manifold and throttle bodies. The fuel injectors had new seals fitted and it all just bolted together nicely.

tbs-fitted


Next up is the remote oil filter then some more cabling to get things started.

Painted

So.. during the last few months I’ve slowly been building up the engine bay. After much measuring and checking of radiator dimensions I’ve plumped for a dinky unit from a Suzuki Swift. It is mounted on a custom frame and is angled backwards to ensure that it clears the bonnet. It isn’t the thickest radiator so I’m going to ensure that an oil cooler is hooked up using the original take off points that are on the 4AGE engine when mounted in a MR2.

Next up was the inlet manifold,and this was bolted to the head. I acquired a set of 4AGE 20V throttle bodies and set about separating them from their inlet manifold and loosely bolted them to the manifold. As I didn’t have a connector for the Toyota throttle pot I took the harder route and knocked up a fixing plate and a threaded adapter to fit the D shaped throttle pot from a Ford/Rover.

tb-fitted

I was about to start making the engine loom and discovered that the injectors had an unusual connector. I soon gave up looking for suitable connectors and instead dug out a fuel rail that had some Denso injectors that took mini power timer connectors. Spending a few minutes a night in the shed resulted a week later in a loom for the engine bay. The ECU is an old DTA E48 chose mainly because it was cheap.

Having assembled this much it was time to pull everything out of the engine bay and get ready for a bit of painting. A lot of the junk from the shed was relocated into the garden shed and painting begun. A 2K etch primer was applied to the bare metal and this was followed a few days later with a high build primer then a few coats of an Old English white sort of colour. This is the colour that looks like Tesco Value Custard under fluorescent lighting but thankfully looks better in daylight.

painted-body

So this is where I was at come the end of June. At this point I then suffered a bad back and then had a weeks holiday in Cornwall so progress stopped.