This is actually a relatively simple job but does need a few tools.
You'll need the following:
You'll also need a replacement trailing arm. Newly manufactured units are available from TVR Car Parts.
It's advisable to note the tracking setting of the rear wheels before you start. This can be done with a tape measure, a laser spirit level and a a large board.
Place the board upright at the rear of the car 1 meter from the front edge of the rims. Place the laser level at the center height of the wheel and shine it one the board. Mark each side on the board and measure the distance that the marks are apart. Move the board back to 3 meters from the front edge of the rim and repeat the step. Using simple maths it would be possible to work out the angle of toe for the wheels.
First step is to remove the regular road wheel and fit the space saver spare. This is because it doesn't have a center cap and allows access to the hub nut. Drop the car to the ground and apply the handbrake and place into gear. Now undo the hub nut....if only it was that easy. They're torqued upto 279-lb/ft and some of the nuts may be left hand thread. It is best to check the visible thread and confirn if this is the case. Despite reading that the nearside is a RH thread and the offside is a LH thread I found that my S3 offside was a RH thread.
I fitted a 400mm tubular extension to my breaker bar and steadily increased the effort on the bar until the nut started to shift. Do not use sharp applications of pressure on the bar as this will only lead to snapped breaker bar heads. Apply the effort smoothly (and watch the bar bend) and it will come undone.
Having removed the nut chock the wheels and jack up the car again and place on axle stands. Now remove the spare wheel and release the handbrake then remove the drum brake.
I then removed the brake shoes and then the 4 bolts that hold the hub to the trailing arm. Using a 3 arm puller it was a simple matter of removing the hub from the drive shaft.
Remove the copper brake pipe from the flexible line on the inside of the trailing arm. Remove the handbrake cable from the drum brake by springing off the cylindrical retaining spring. It may not be obvious but it is split length ways and just needs springing off and then the cable can be persuaded to leave the brake.
Now you should have a trailing arm and a shock left. Undo the shock to trailing arm mounting with some 19mm sockets and spanners and swing out of the way. Next undo the 2 bolts that hold the trailing arm (they're imperial bolts and you may find that you need a thin spanner to fit the nut of the outside bolt) in place and wiggle it out of the lugs. Now it can be removed and I suggest that the drive shaft splines be covered by placing a plastic bag over them.
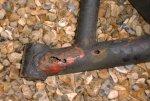
This is state of the swingarm that I had to replace.

Fitting a new trailing arm is simply the reverse of the above... assuming that you have the metalistic bushes pressed into your new trailing arm.
Finding a torque wrench that covers the 239-280lb ft that the hub nut must be torqued upto could be a problem and it is probably cheaper to find a local mechanic to torque it up.
You may find that you need to drill a couple of holes for the brake pipe mountings, in which case do this before fitting the new arm.
Also, the reason you're probably replacing the trailing arm is because of corrosion so it would be wise to protect the internals of the round tubes with a good spray of a rust inhibitor.