Category Archives: MG Midget

Tramp free Midget

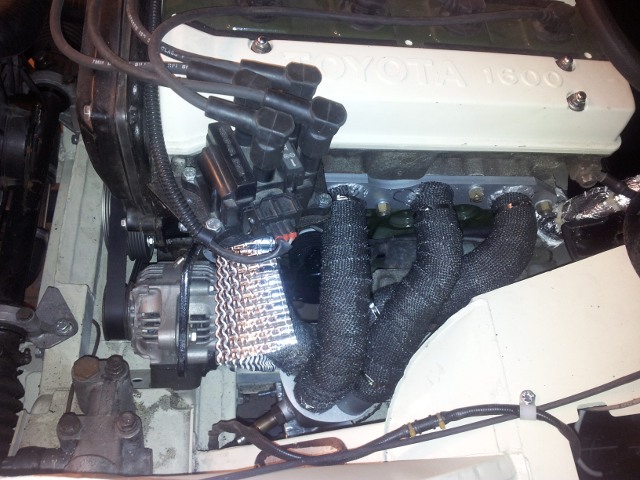
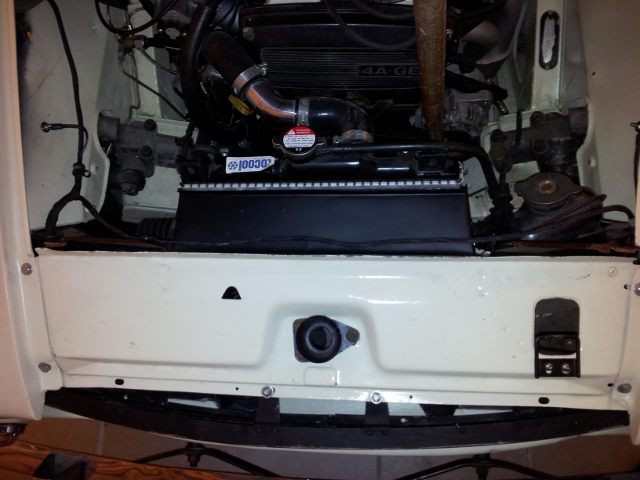
Since it has been on the road the air filter on the 4AGE throttle bodies has been a foam ITG unit that slips over the trumpets. You hear that sock style air filters rob power and I don’t see why the filter I was running would be any different. Also the noise generated was rather excessive so something needed to be done. Some time ago I purchased a Pipercross PX600 airbox but hadn’t gotten round to fitting it.

Clearance under the bonnet is tight ( the existing foam filter touches the bonnet) so it required some juggling to fit. By aligning the airbox so that it was high at the rear and low at the front it fitted under the bonnet. However it did just touch the bonnet but this was overcome by the use of a heat gun and some reshaping of the airbox on the top edge.

midget-airbox

The good news is that it all works and induction noise is much reduced so turning it more into a Q car.

This weekend I’ve finally fitted an anti-tramp bar kit that I purchased a while back from a trader at the MG event at Silverstone.  Thinking I would need longer U bolts I made enquiries to the trader but (fortunately) they didn’t reply so I started looking at making the brackets that attach to the springs. This was when I discovered that the kit I had been sold wouldn’t work because the rear brackets weren’t for a Midget.  At least I found this out before buying longer U bolts.  A few hours of cutting, drilling and welding had some rear brackets made up and the anti-tramp bars fitted.  Next up will be the panhard rod.

anti-tramp-bar

First show

On the way to the first show for the Midget I realised that I’ve probably done more miles in the Midget in less than 2 months than I’ve done in 10 months in the Porsche.  Anyway, the sun was out and we popped down to Helmingham Hall for their annual classic car show.

Despite arriving earlier than usual we were at the back and next to a Cobra replica and some glorified Beetle  – well it only had 4 cylinders.

helmingham-2014

We had a chat with a few other Midget owners and didn’t get hung by any purists either. Car of the show for me was a nice usable 911 and closely followed by a silver Scimitar GTE.

helmingham-911

We arrived home in one piece then after a cuppa Louise had her first drive in a car that is older than she is.  Going from a Boxster to a Midget is a bit of a shock but she also found that after a few miles it had a fun factor but in a different kind of way to the clinical efficiency of a Porsche.   Annoyingly she also had the first wave from a fellow MG driver.


6 weeks on

It has been six weeks since the Midget hit the road but unfortunately it was off the road a bit during that time.  After the first week the alternator started to screech badly so a new one was ordered. When it arrived I realised that the used on fitted had the rear housing turned 90 degrees and the wiring wouldn’t reach. Rather than strip open a brand new unit I ended up  removing the exhaust manifold and remaking the wiring.  When completed I went to fire it up and there was a buzz of the fuel pump then a bang. The pump fuse was blown and further testing revealed a dead fuel pump.

I was never happy with the swirl pot in the fuel tank so this was an opportunity to fit an external swirl pot and a Facet lift pump. One week later (and having missed MG90 at Silverstone) and I was back on the road.

Over the weeks there was much fettling of the fuel and ignition map and now it is running quite well but more power must still be there for the taking.  One area that I’ve thought was poor was the brakes due to their lack of effect and even heavy brake pedal effort seemed to make no difference. The pads fitted were some stock Mintex pads ( not the M1144) so it was time to try something else. The EBC Greenstuff is much maligned on the forums but the EBC products seem to be constantly evolving so I thought I’d give them a try. Initial impressions after a few miles is that they are very effective and they have a nice pedal feel. I’m hopeful that they’ll stand up to spirited driving in what is only a 700Kg car.


Mapping

I’ve been playing with the LC-1 logging and roughly adjusting the mixture based on the traces but with the ECU and LC-1 being separate it is very much a case of adjusting the fuelling a range of cells and hope for an improvement. The improvements are coming and it is starting to pull a lot better. I’m even getting used to the handling characteristics so it is more fun now.

The discovery of the day is that the DTA E48 ECU I have is at V8 of the hardware and this means that it will take a 0-5 volt wideband lambda input and the LC-1 provides this on the #2 analogue output. This afternoon I wired up the LC-1 to the ECU and created a lambda translation table covering the range supported by the ECU. Firing it up and I had a reading in the ECU software. This might help me get the mapping sorted quicker although the DTA will only record the last 3 minutes of logs.  I’ve just remembered that MegaLog Viewer should be able to read DTA files so that is something for tomorrow morning.

MOT Time

So with the MOT test booked for Monday the weekend was spent tidying up little bits and piling up a few spares and some tools ready for the first drive to the MOT station. A couple of gallons of fuel were added to take the gauge off the empty line and took it almost to half way.

Monday morning came and this was my first drive ever on a road in a Midget.  Prior to that all I’ve done is spin it round on the drive, so this first drive was a bit of an eye opener. I know it is called a Midget but it is small and the drive to the MOT station was thankfully soon over. What I didn’t expect was to turn around and head home so soon.  Despite pre-booking it, the MOT man wasn’t in so no chance of a MOT today.

Not one to waste  a chance of a run home I hooked up the Innovate LC-1 to the laptop and logged the return journey.  I didn’t need the LC-1 to tell me it was lean – the throttle bodies did a good job doing that with all their spitting.  Once home a quick +10% fuel hike across the main rev range that I was running in, and a general smoothing of the fuel table ready for Tuesday.

Tuesday’s run to the MOT station was much better and the fuelling appeared far improved and no spitting from the old gal today. The car even felt more solid to drive despite not having done anything other than a quick cut and polish in the morning.

On to the MOT and there was a surprised face when the bonnet was lifted – he wasn’t expecting a 16v engine. The MOT test went fine with the examiner commenting on the solid condition on the Midget. Not surprising really considering the number of panels that were replaced. One headlight needed adjusting but everything else was fine and even the brakes were very evenly balanced side to side.

Leaving the MOT station I switched on the AFR logging and the result was a much richer mix in the 12 – 14:1 range.  That will do for the moment as it makes the thing drivable. Once home the headlight surrounds were fitted then it was time to pose…

midget-home

So just under 3 years and 3 months and the ebay Midget was reborn. Now to make it handle like a Porsche….

Wrapping up

It has been less than 2 weeks since the last post and the to-do list has decreased substantially.

The transmission tunnel is all carpeted and the gear lever gaiter and surround fitted. The gaiter is from a MR2 Mk1 and the original Midget surround needed cutting and forming before being welder back together. A quick coat of satin paint and it was screwed into place and looks sort of ok. I will sort out the larger opening at some point but time isn’t on my side so it will do.

midget-interior

Next up was the manifold and heat shield. I’m not overly keen on the idea of exhaust heat wrap due to reports of the corrosion that can occur underneath it. However this car won’t be used heavily so anything that helps keep the temperature down is worth a go.  Fitting it is a messy job that I hated doing and little strands of fibre go everywhere.  An additional shield was made to try and protect the alternator from the heat and clamped to the front primary.  I’m hoping that will be enough to keep it cool on the drive to Silverstone.

manifold-wrap

This evening saw the engine run up to full temperature for the first time and then waiting for the fan to kick in. I probably worry too much about this sort of thing but I didn’t want to cook the engine so close to MOT time. Anyway the good news is that the fan did kick in eventually and the temperature was back under control in a few seconds so hopefully that little Suzuki Swift radiator will be up to the job.

While running to temperature the mixture setting was monitored and we are running a bit rich with an AFR ratio of 13:1 at idle and around 12:1 with some revs.  The throttle pump effect needs a tweak though because it does lean out noticeably as the throttle is opened before the fuelling kicks in.

The MOT is booked for next Monday so just 4 days to play before the maiden road voyage.

Hoody

The main achievement this week has been fitting the new hood. The vinyl of the original hood was still in good condition but the windows were torn so a new hood was ordered from donhood.com.  It was with trepidation that I started fitting it but marking the centre line on the car at the rear and on the hood gave me confidence that it would at least be central.  I used the fitting instructions downloaded from the MGOC because they were more concise .

The header rail was pop riveted in place as per the original mainly because the holes were a bit too large for screws. Hopefully I’ll have no need to remove the hood from the rail.

hood-rear

hood-front


The hood came with 6 Tenax fasteners but I’ll use 2 more to replace the velcro strips used on some Midgets and these are still to be fitted.

Since the above photo was taken the passenger door handle and lock are installed and the inner window strip was also fitted.

It is now the 22nd and I’ve just realised that I didn’t publish this post so here is a bit more… The to-do list is getting shorter following a few evenings working on the doors. The door mirrors were fitted using the Midget specific mounts for the Tex mirrors.  I did remember to wind the window up before drilling through the door…

behind-you

To save time the existing navy blue door cards were re-used and I’ll sort something out when I’m on the road. It could be new door cards in black or I could try spraying the navy ones, we’ll see. I’m sure the MOT man won’t care too much that the cards don’t match the rest of the interior.

door-cards

Next up will be finishing the tunnel area. I’m hoping to be MOT ready in two weeks.

Mind the gap

Slowly getting there (I say that to keep me going) but all the finishing bits take more time than expected. Finally finished making the interior panels for the main tub of the car and just the door cards to make at some point. All the carpet is now cut to shape and glued in place and the contact adhesive makes the Midget now smell like a TVR.

Fitted the doors and for some reason the passenger door didn’t seem to fit properly in the gap any more.  A few minutes with my favourite hammer and the gap was opened up but now I need to repaint that section of the car.

door-gap

At the weekend the paintwork was redone using a cheap £10 touch up spray gun and the quality of finish was far better than the rest of the panel so I may have to revisit this at a later date.

And finally tonight I’ve fitted the seatbelts and the newer Elise  seats that I picked up locally at the weekend. Fitting the seatbelts involved removing the roll over bar due to the latter blocking access to the seatbelt mounts on the wheel arch . It really is starting to look like a complete car.

elise-seats-midget-1

The week – part 2

Day 3 of the week’s push for completion and it feels like little progress today.  Little progress however means that the indicator bulb holders have been repaired, cleaned up and fitted. All the wiring to the front of the car is now complete and secured out of the way.  I can’t recall how the bonnet release cable was secured because the original securing bolt was broken off so I made up another cable end. While messing with the bonnet release I ended up shortening the outer casing because I’ve relocated the bonnet release due to the custom heater box being in the way.

The other tasks done included fully fitting the nose assembly and making up a cowl to fill the gap between the nose and the radiator.  The front bumper was retrieved from storage and bashed into a straighter shape with a large hammer.  It isn’t in good condition but I’m not building a concourse car and it does serve the purpose of hiding the poor front end.

rad-cowl


front-bumper-fitted

The rear number plate is now fitted using LED plate bolts but while at the back of the car I noticed a fluid leak. The brake line into a wheel cylinder was leaking quite badly. Quite why this hasn’t leaked before I don’t understand but tightening the connector and testing didn’t show any more leaks so fingers crossed and I’ll be keeping an eye on it.

Days 4,5 & 6 were also spent decorating so not as much Midget fettling time.  The front bumper was fully fitted but not without doing things the hard way. It didn’t come fitted so I acquired some mounting brackets and it needed 2 x 1/2″ UNF nuts. As usual I didn’t have any but I found a 1/2″ UNF tap so some 7/16″ nuts were opened up on the lathe then tapped and hey presto I had a pair of nuts.

Next up was the USB charger point that we now seem to rely on. A £3 dual cigarette & dual USB unit was wired into a permanently live supply with a separate under dash fuse. It then dawned on me that as it steps 12v down to 5v that it would draw a current all the time so the fuse is pulled for the moment and a switch will be fitted somewhere. Fortunately there is a LED indicating when it has power so I shouldn’t leave it draining the battery…

usb-charger

Attention then turned to the interior and finishing making the panels and carpeting the lower sections. More on this later.

The 4A-GE Midget gets closer

Having to use up a load of holiday I’ve another week off so can spend some time on the 4AGE Midget.

With a spare hour on Saturday I managed to attend to the wings. Being GRP wings I didn’t take them to the gel coat and sure enough a couple of areas reacted to the primer on one wing. A rub down and a spray with a barrier coat paint had them ready for priming.  Monday was a bit cold but I was able to prime and top coat the wings an bonnet and rectify the boot lid.

Fitting the bonnet was easier than I expected but the rear edge was rather low. I was expecting to have to shim out the hinge but after a lot of searching I found a reference to placing blocks of wood under the V of the hinge and then gently forcing the bonnet down. Sure enough that raised the rear of the bonnet to the top of the scuttle.

You can just make out that the rear of the bonnet is below the top of the bulkhead.

Having had to move the car earlier to make space in the shed, it was frustrating that it wasn’t running as well as it had before. If revved it would die at 3000rpm and just wouldn’t run. I’m rather ashamed to say that the problem was a lack of fuel and as soon as I put a gallon in the tank the fuel gauge moved from empty and it started to behave.

Day 2 of the holiday and I’m winging it today.  The wings are GRP and I recall that they weren’t a brilliant fit when I got the car. Therefore I’m not expecting miracles and will have to accept that I can only do so much with them.  Come lunchtime and I have the offside wing fitted and come mid afternoon both wings are bolted into place and aligned the best that I can. The offside wing is slightly shorter than the bonnet and this is something I spotted on a couple of cars at Silverstone a few years ago.

wings-fitted

After a coffee break it was on to the wiring ( a job I really do like ) and time to fit some new headlights. With the headlights fitted it was time to test that they worked. Battery connected, ignition on and we have dipped beam but no full beam. The full beam relay didn’t even click so that was swapped with the known working dipped beam one but still no joy.  For some reason I went straight to removing the fuse & relay box and the cause was obvious, some muppet hadn’t fitted the relay signal earth lead. Ten minutes and one lead later and we have working main beams.

bright-eyes

Just as I was turning the car round on the gravel drive my dear wife  arrived home to witness some hooligan behaviour 🙂

Time for an Old Crafty Hen to celebrate…